Concurrency
Iterator, Generator
Python generators : simple way of creating iterators. A generator, in simple words, is a function that returns an object(iterator) which we can iterate over (one value at a time)
iterator : 반복 가능한 객체 (iterable objects) can be used in for loops.
examples of iterator: collections, strings, lists, dictionaries, sets, tuples, unpacking, *args…
Iterator
반복가능한 이유 : iter(x) 함수 호출 가능.
내부적으로 다음과 같이 exception을 고려하여 수행 됨.
t = 'ABCDEFGHIJKLMNOPQRSTUVWXYZ'
print(dir(t)) # dir()로 attributes 모두 출력해서 iter()이 있는지 확인

w = iter(t)

while True:
    try:
        print(next(w))
    except StopIteration:
        break
Generator
기본 class를 사용하여 iterator를 만들려면 다음과 같이 다소 긴 code가 필요하다.
# class-based iterator to produce odd numbers
class get_odds:
    def __init__(self, max):
        self.n=3
        self.max=max

    # return the iterator object
    def __iter__(self):
        return self

    # return the next value in the sequence (or raise StopIteration when there are no values to be returned)
    def __next__(self):
        if self.n <= self.max:
            result = self.n
            self.n += 2
            return result
        else:
            raise StopIteration


numbers = get_odds(10)
print(next(numbers))
print(next(numbers))
print(next(numbers))
output은 3, 5, 7이다.
“get_odd” class에서 위 code와 같이 iter와 next 함수가 implement되어야한다.
generator를 사용하며느 이 과정이 훨씬 더 간소화될 수 있다.
yield
regular function vs. generator function:
- In regular function, return statement terminates the function completely, but in generator function, by using the built-in keyword yield it can save the state of the function.
- When using generator function, next time the function is called, execution continues from where it left off, with the same variable values it had before yielding
- generator function은 function을 수행하지않고, generator object를 생성하여 반환만 한다. generator object에 next() 함수가 호출될때에만 generator function내의 내용이 수행된다.
Generator를 사용해서 위와 동일한 iterator를 구현할 수 있다.
def get_odds_generator():
    n=1
    n+=2
    yield n
    n+=2
    yield n
    n+=2
    yield n


# Call the generator function to get the generator or the iterator object returned as "numbers"
numbers=get_odds_generator()
# Call next() method to retrieve elements from the iterator object "numbers"
# value of first yield = 3
print(next(numbers))
# value of second yield = 5
print(next(numbers))
# value of third yield = 7
print(next(numbers))
output은 동일하게 3, 5, 7이다.
또 다른 예시,
def fibonacci_generator():
    n1=0
    n2=1
    while True:
        yield n1
        n1, n2 = n2, n1 + n2


sequence= fibonacci_generator()
print(next(sequence))
print(next(sequence))
print(next(sequence))
print(next(sequence))
print(next(sequence))
output은 Fibonacci numbers 시퀀스의 첫 5개 숫자인 0, 1, 1, 2, 3 이다.
A function becomes a generator function if it contains at least one yield statement
generator function을 활용한 다른 예시:
일반적으로 generator는 loop과 함께 implement된다. 위 예시들은 next()함수의 기능을 보여주기 위한것이고, 일반적으로 generator 함수를 통해 item을 하나씩 꺼내려면, 당연히 loop이 필요할 것이다.
Generator는 built-in keyword yield를 사용해서 다음에 return할 요소의 위치를 기억함. index를 굳이 사용하지 않아도 됨. (나중에 yield는 coroutine에 사용 됨.)
class WordSplitterGenerator:
    def __init__(self, text):
        self._text = text.split(' ')

    # iter함수를 구현해주면, 내부적으로 이 yield라는 keyword를 통해
    # 다음에 return될 원소의 위치값을 기억한다.
    def __iter__(self):
        for word in self._text:
            yield word
        return

    def __repr__(self):
        return 'WordSplitterGenerator(%s)' % (self._text)
generator의 활용 cases:
- 지능형 리스트, 딕션어리, 집합 -> 데이터 양 증가 또는 메모리 사용량 증강 시, generator 사용 권장
- 단위 실행 가능한 coroutine 구현과 연동
- 작은 메모리 조각 사용
generator expression
Lambda function이 anonymous functions를 생성하는것과 같이, generator expression은 anonymous generator function을 생성한다.
list comprehension과 비슷한 syntax를 사용한다.
generator expression vs. list comprehension
#Generator Expression
accumulated_gexp = sum((1 + x for x in range(2000000)))
print(accumulated_gexp)
>> 2000001000000

#List Comprehension
accumulated_listcomp = sum([1 + x for x in range(2000000)])
print(accumulated_listcomp)
>>2000001000000
code를 작성할때에는 [ ] 와 ( ) 의 차이로 매우 비슷해보이지만, memory efficiency 관점에서는 generator expression을 활용하는것이 더 낫다.
generator는 위에서 언급한 python iterator protocol yield를 활용하기때문이다. Generator은 yield를 통해 iterator내 item이 필요한 시점에 그 item만 다루면 되지만 (lazy execution), list comprehension의 경우에는 생성된 list의 content를 다 다루어야 한다.
- Comparison of memory efficiency
from sys import getsizeof

accumulated_gexp = (1 + x for x in range(2000000))
print(type(accumulated_gexp))
print(getsizeof(accumulated_gexp))
output:
<class ‘generator’>
112
accumulated_listcomp = [1 + x for x in range(2000000)]
print(type(accumulated_listcomp))
print(getsizeof(accumulated_listcomp))
output:
<class ‘list’>
17632624
- Comparison of time efficiency
import timeit

generator_exp_time = timeit.timeit('''accumulated_gexp = (1 + x for x in range(200))''', number=1000000)
print(generator_exp_time)
output:
1.5132575110037578
list_comp_time = timeit.timeit('''accumulated_listcomp = [1 + x for x in range(200)]''', number=1000000)
print(list_comp_time)
output:
29.604462443996454
send
yield를 통해 generator 함수에서 생성된 값을 하나씩 받는 것 외에도, generator에게 값을 전달해서 generator 함수내의 동작을 control할 수 있다. 이때 사용되는 keyword는 send 이다.
send를 통해 보내는 값은 “current” yield expression의 결과 값일 것이고, generator 함수가 yield한 “next” value를 반환해줄 것이다.
don’t expect the generator to return the value we have just sent because it will return the next one.
다음 예시는 generator에게 특정 단어를 send하여 동작을 멈추게 하는 것이다.
“stop”이라는 단어가 외부에서부터 send되면, generator는 loop을 terminate하도록 설정되어있다.
def gen_roster(names):
    while names:
        for name in names:
            current_name = yield name
            if current_name == 'stop':
                names = None
                break

# run
roster = gen_roster(names)
for i in range(10):
    if i == 3:
        roster.send('stop')
    print(next(roster))
Output으로는 names 리스트의 첫 3개의 이름이 출력되고 4번째 순서일때에 (i=3) generator 함수내의 내용이 수행되지않고 StopIteration exception이 발생한다.
Itertools
Itertools = Python’s module that provides various functions that work on iterators to produce complex iterators. Itertools works as a fast, memory-efficient tools.
Itertools의 주요 함수를 사용해서 iterator를 implement하고 데이터를 센스있게 잘 다룰 수 있음.
ex) count, takewhile, filterfalse, accumulate, chain, product, groupby, etc,,,
import itertools

gen1 = itertools.count(1,2.5)
print(next(gen1))
print(next(gen1))
print(next(gen1))
print(next(gen1))
# ... 무한

# 조건
gen2 = itertools.takewhile(lambda n : n < 1000, itertools.count(1, 2.5))
for v in gen2:
    print(v)

# filterfalse : filter 조건의 반대에 해당하는 것들만 남겨!
gen3 = itertools.filterfalse(lambda n : n < 3, [1,2,3,4,5])
for v in gen3:
    print(v)

# 누적 합계
gen4 = itertools.accumulate([x for x in range(1,101)])
for v in gen4:
    print(v)

# 연결1
gen5 = itertools.chain('ABCDE', range(1,11,2))
print(list(gen5))

# 연결2
gen6 = itertools.chain(enumerate('ABCDE'))
print(list(gen6))

# 개별
gen7 = itertools.product('ABCDE')
print(list(gen7))

# 연산(경우의 수)
gen8 = itertools.product('ABCDE', repeat=3)
print(list(gen8))

# 그룹화(반복되는 원소의 그룹화)
gen9 = itertools.groupby('AAABBCCCDDEEE')
# print(list(gen9))
for chr, group in gen9:
    print(chr, ":", list(group))
Concurrency and parallelism
동시성(concurrency)
- CPU 가용성 극대화를 위해 Parallelism의 단점 및 어려움을 software(구현) level에서 해결하기 위한 방법
- 싱글코어에 멀티스레드 패턴으로 작업 처리
- 동시 작업에 있어서 일정양 처리 후 다음 작업으로 넘기는 방식. 즉, 제어권을 주고 받으며 작업 처리 패턴. 병렬적은 아니나 유사한 처리 방식
- 하나의 computer가 여러 일을 동시에 수행하는 것 (하나의 cpu, 하나의 thread, 등등). 내가 멈춘 위치를 잘 알고 그대로 pickup할 수 있어야 (closure, generator의 yield, 등 활용)
예시) coroutine의 활용 - thread는 하나 이지만, 마치 여러 작업을 동시에 하는 듯
장점: 단일 프로그램안에서 여러 일을 해결
병렬성(parallelism)
여러 computer가 여러 작업을 동시에 수행. worker가 여러 작업을 동시에 수행
예시) Data scientist - 병렬로 동시에 여러 site에서 crawling작업 수행.
동시에 다 작업해서 취합은 한곳에서
장점: 속도
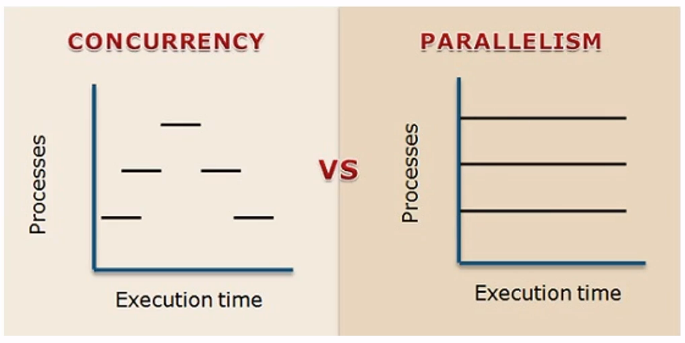
concurrency vs. parallelism
Concurrency:
논리적, 동시 실행 패턴(논리적), 싱글 코어, 멀티 코어에서 실행 가능, 한 개의 작업 공유 처리, 디버깅 매우 어려움. mutex와 deadlock 같은 기능을 활용하여 synchronization 구현. OS에 대한 이해가 필요함.
Concurrency가 적합한 경우:
실행하려는 task가 IO-bound operations (e.g., querying a web service or reading large files) 이라면, concurrency option이 더 적합하다. If we run two CPU bound operations as two threads then they will run sequentially and we will not yield any benefits in Python. IO-bound operations에는 external resources (e.g., hardware or network)와 communicate해야하는 과정이 요구되고, I/O bound operation이 I/O waiting 상태로 external resource로 부터 result를 반환 받기까지 기다려야하기 때문임. 또한 context switching이나 lock acquisition 때문에 여러 thread로 실행하게되면 오히려 더 긴 소요시간이 발생할 수 있다.
Parallelism:
물리적으로 동시 실행, 멀티 코어에서 구현 가능, 주로 별개의 작업 처리, 디버깅 어려움, openMP, MPI, CUDA
Parallelism이 적합한 경우:
“At a high level, if your Python application is performing CPU bound operations such as number crunching or text manipulation then go for parallelism. Concurrency will not yield many benefits in those scenarios.”
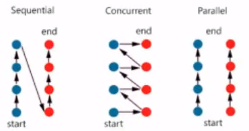
sequential vs. concurrent vs. parallel:
Coroutine
thread: OS 에서 직접 관리함, CPU core에서 실시간, 시분할(시간을 서로 나눈) 비동기 작업을 “멀티쓰레드”라고 함. single thread 또는 multi thread로 사용 가능.
thread ->복잡 ->공유되는 자원 ->교착 상태 (deadlock or race condition) 발생 가능성, context switching 비용 큼, 자원 소비 가능성 증가
switching 비용이 큰 경우가 종종 있기 때문에, multi thread보다 오히려 single thread가 더 효율이 높은 수 있음.
coroutine: 단일 (single) thread를 의미함. 메인과 서브가 서로 상호 작용하면서 stack을 기반으로 동작하는 비동기 작업. 단일 thread에서도 순차적으로 상호작용을 하면서 여러 작업이 진행될 수 있음. coroutine은 Python외에 Golang과 같은 다른 언어에서도 구현 가능함.
즉, main function 안에서 여러 sub routine을 실행 + 중지하는 과정을 구현해서 하나의 thread안에서 여러 작업이 동기화되어 진행 될 수 있도록 한다. 여기서 yield와 send를 통해 main과 sub가 서로 데이터를 주고 받을 수 있다.
Think of coroutine as a function that has one or more checkpoints where the execution will be paused and control will be returned to the point where it was called from.
A coroutine is a function divided into many parts and we can execute each part of a coroutine as we execute each iteration of a for loop using the next function.
yield: yield라는 keyword를 통해서 메인 <-> 서브 루틴이 서로 상호작용함. coroutine을 제어 할때에 yield keyword를 사용 함. yield와 send를 통해서 coroutine을 제어하고, 상태를 저장하고, 양방향으로 데이터 전송을 함.
sub routine: “흐름 제어” - main routine에서 호출하면 -> sub routine에서 수행
coroutine: “동시성 프로그래밍” - 루틴을 실행 중, 중지하고(상태를 기억하고), 다시 재 실행할 수 있음.
coroutine의 장점: thread에 비해 overhead 감소 (단일 thread이기 때문에, 운영 체제에게 자원(thread)을 덜 요구하게 됨.)
NOTE: Python 3.5 이상에서는 def -> async, yield -> await 바꾸어서 사용할 수 있음.
# Coroutine Ex1
# def를 통해 generator, coroutine(yield를 사용하는 generator에서 파생된)을 생성할 수 있음.
def coroutine1():
    print('>>> coroutine started.')
    i = yield
    print('>>> coroutine received : {}'.format(i))


# Generator 선언
cr1 = coroutine1() # Main routine이며, "일"하나에 해되며 coroutine1() 속에 define된 task들이 subroutine에 해당 됨.

# generator 객체라고 출력됨.
print(cr1, type(cr1)) # output = "<generator object coroutine1 at 0x0000020D7E9BB740> <class 'generator'>""

# 여기에서 subroutine은 main에서 반환값을 주는 것 밖에는 없었음. 수동적임.
# 첫번째 next(cr1)에서는 coroutine()이라는 generator내의 첫번째 yield 지점까지 subroutine을 수행 하고 정지. 여기 상태를 기억.
next(cr1)
# 값 전송
# send(): main routine과 subroutine이 서로 data를 주고받을 수 있게 함. next()의 기능도 포함하고 있음.
cr1.send(100) # coroutine이 100을 받는다. output = "">>> coroutine received : 100"

# 잘못된 사용
# 다음과 같이 generator 선언 후, 바로 send()의 parameter로 값을 전달하는 경우, 예외 발생
cr2 = coroutine1()
cr2.send(100) # output = "TypeError: can't send non-None value to a just-started generator"

# 맞는 사용법
def coroutine():
    print('>>> coroutine started.')
    i = yield
    print('>>> coroutine received : {}'.format(i))
cr3 = coroutine()
next(cr3)
cr3.send(50)
인프런 과정에서의 설명이 헷갈린다. 다음 예시가 yield와 send의 역할을 좀 더 간단명료하게 보여준다.
def func():
    print('Function part 1')
    x = yield
    print(x)
    print('Function part 2')
    a = yield
    print(a)
    print('Function part 3')

# 위 generator function을 통해 send와 yield 활용해보기
try:
    y = func()
    next(y)	        # Function part 1 executed, to reach the first yield we used next
    y.send(6)		# Function part 2 executed and value sent 6
    y.send(12)		# Function part 2 executed and value sent 12 and StopIteration raised

except StopIteration as e:
    pass
output:
Function part 1
6
Function part 2
12
Function part 3
위 실행 output과 같이 send를 통해 숫자를 보내려면, next() 함수를 한번 호출해서 yield checkpoint에 도달해있어야한다. (그래서 generator object y를 생성한 뒤, next(y)를 먼저 호출함.)
coroutine 활용하기
def func1():
    print('Function 1 part 1')
    yield
    print('Function 1 part 2')
    yield
    print('Function 1 part 3')
    yield
    print('Function 1 part 4')
    yield
    print('Function 1 part 5')

def func2():
    print('Function 2 part 1')
    yield
    print('Function 2 part 2')
    yield
    print('Function 2 part 3')
    yield
    print('Function 2 part 4')
    yield
    print('Function 2 part 5')


try:
    a = func1()
    b = func2()
    next(a)  	# Will execute Function 1 part 1
    next(b)  	# Will execute Function 2 part 1
    next(a)  	# Will execute Function 1 part 2
    next(a)  	# Will execute Function 1 part 3
    next(b)  	# Will execute Function 2 part 2
    next(b)  	# Will execute Function 2 part 3
    next(b)  	# Will execute Function 2 part 4
    next(a)  	# Will execute Function 1 part 4
    next(a)  	# Will execute Function 1 part 5 and raise StopIteration exception

except StopIteration as e:
    pass
output:
Function 1 part 1
Function 2 part 1
Function 1 part 2
Function 1 part 3
Function 2 part 2
Function 2 part 3
Function 2 part 4
Function 1 part 4
Function 1 part 5
이렇게 위와 같이 두 개의 coroutines를 부분적으로 수행하며 왔다갔다 오갈 수 있다.
원하는 조건과 순서가 구현된 scheduler을 작성하여 multiple coroutine들 사이에서 원하는 switching을 구현해서 single threading만으로 multithreading의 효과를 만들어 낼 수 있다.
이런 coroutine의 기능은 concurrency가 구현되어야하는 producer-consumer or sender-receiver 형태의 기능이 필요한 network programming에서 유용하게 활용될 수 있다.
generator state 확인
getgeneratorstate를 통해서 coroutine의 상태를 확인할 수 있다.
generator states:
# GEN_CREATED : 처음 대기 상태
# GEN_RUNNING : 실행 상태
# GEN_SUSPENDED : Yield 대기 상태 (send로 데이터를 보내거나 받을 수 있는 상태)
# GEN_CLOSED : 실행 완료 상태
# sub routine과 main routine사이 값이 오고 가는 과정 구현:

def coroutine2(x): # main routine에서 sub routine으로 x를 전달
    # x를 main routine으로부터 받아서 출력
    print('>>> coroutine started : {}'.format(x))
    # y는 main routine에서 send로 받을 예정. (x를 send를 통해 sub routine에서 main routine으로 전달 (양방향 데이터 주고받기: 동시성 가능))
    y = yield x
    # y를 main routine으로부터 받아서 출력
    print('>>> coroutine received : {}'.format(y))
    # x+y를 subroutine에서 main routine으로 전달
    # main routine이 sub routine에게 넘긴것은 z
    # sub routine이 나에게 준것은 x+y
    z = yield x + y

    # z를 main routine으로부터 받아서 출력
    print('>>> coroutine received : {}'.format(z))

    # 오른쪽 : sub routine이 나에게 주는거
    # 왼쪽: 입력을 받는거 (main routine에게 전달되는 값)


# cr3 = coroutine2(10)

# print(next(cr3)) # yield를 통해 x가 주어진 상태, y 값을 받기위해 대기 중
# cr3.send(100) # y는 100을 받았고 (x는 10이 주어진 상태) yield를 통해 x+y가 주어진 상태, z 값을 받기위해 대기 중
# cr3.send(100) # StopIteration이 걸림.

# 상태값 확인
from inspect import getgeneratorstate

cr3 = coroutine2(10)
print("상태 값 확인")
print(getgeneratorstate(cr3))
print(next(cr3))
print(getgeneratorstate(cr3))
# cr3.send(100)
# print(getgeneratorstate(cr3)) # send를 보내야하니까 여기서는 GEN_SUSPENDED

# x+y를 확인하기위해서는 print()로 확인가능
print("확인")
print(cr3.send(100)) # output = send의 결과로 ">>> coroutine received : 100" 그리고 subroutine이 나에게 주는 값 "110"은 print의 결과로 확인
Iterable한 object내 element를 순차적으로 꺼내기 위해서 다음과 같이 coroutine을 활용해볼 수 있다.
# Coroutine Ex3
def generator1():
    for x in 'AB': # iterable한 string에서 순차적으로 끝날때까지
        yield x
    for y in range(1,4): # 사실, range가 list를 반환해주는 것도 generator를 활용하는 것임.
        yield y

t1 = generator1()
print(next(t1))
print(next(t1))
print(next(t1))
print(next(t1))
print(next(t1))
# print(next(t1)) # StopIteration 예외 발생

t2 = generator1()
print(list(t2)) # 알아서 next가 호출되어서 list가 생성됨.


# yield from을 활용해보기
def generator2():
    yield from 'AB'
    yield from range(1,4)

t3 = generator2()
print(next(t3))
print(next(t3))
print(next(t3))
print(next(t3))
print(next(t3))
# print(next(t3)) # StopIteration 예외 발생
Coroutine은 asyncio, twisted, aiohttp와 같은 framework들의 building block으로 활용된다.
yield from
keyword yield from을 사용해서 하나의 generator function을 다른 generator function에 embed할수도 있다.
예시:
def step_generator(start, stop, step):
    i = 0
    while start + step * i != stop:
        yield start + step * i
        i += 1
    return i


def wrapper_generator():
    count = yield from step_generator(0, 10, 2)
    print(f"Generated {count} numbers")


if __name__ == "__main__":
    for f in wrapper_generator():
        print(f)
output:
0
2
4
6
8
Generated 5 numbers
generator를 활용한 async code
generators could be kept in a map, connecting the generator to the event it is waiting for. when the event occurs we can simply take the next event from the generator and again wait for it to happen.
Inside the generator we can have any amount of logic among yield expressions as long as there are no blocking operations. Basically, we write our logic as if it was synchronous code but instead of blocking on some operation we yield what we are waiting for.
counter = 0

def wait_for_b():
    yield "B"

def wait_for_c():
    yield "C"

def task_generator():
    global counter
    id = counter
    counter += 1
    print(f"{id} Processing event A, blocking on B")
    yield from wait_for_b()
    print(f"{id} Processing event B, blocking on C")
    yield from wait_for_c()
    print(f"{id} Processing event C, task done")

def app():
    tasks = {"A": [], "B": [], "C": []}
    while True:
        print(f"Task queue size {len(tasks['A'] + tasks['B'] + tasks['C'])}")
        event = input("> ").strip()

        if event == "A":
            new_task = task_generator()
            waiting_for = new_task.send(None)
            tasks[waiting_for].append(new_task)

        if len(tasks[event]):
            task = tasks[event][0]
            tasks[event].remove(task)
            try:
                waiting_for = task.send(None)
                tasks[waiting_for].append(task)
            except StopIteration:
                pass


if __name__ == "__main__":
    app()
output:
Task queue size 0
> A
0 Processing event A, blocking on B
Task queue size 1
> A
1 Processing event A, blocking on B
Task queue size 2
> A
2 Processing event A, blocking on B
Task queue size 3
> B
0 Processing event B, blocking on C
Task queue size 3
> B
1 Processing event B, blocking on C
Task queue size 3
> C
0 Processing event C, task done
Task queue size 2
> C
1 Processing event C, task done
Task queue size 1
> B
2 Processing event B, blocking on C
Task queue size 1
> C
2 Processing event C, task done
Task queue size 0
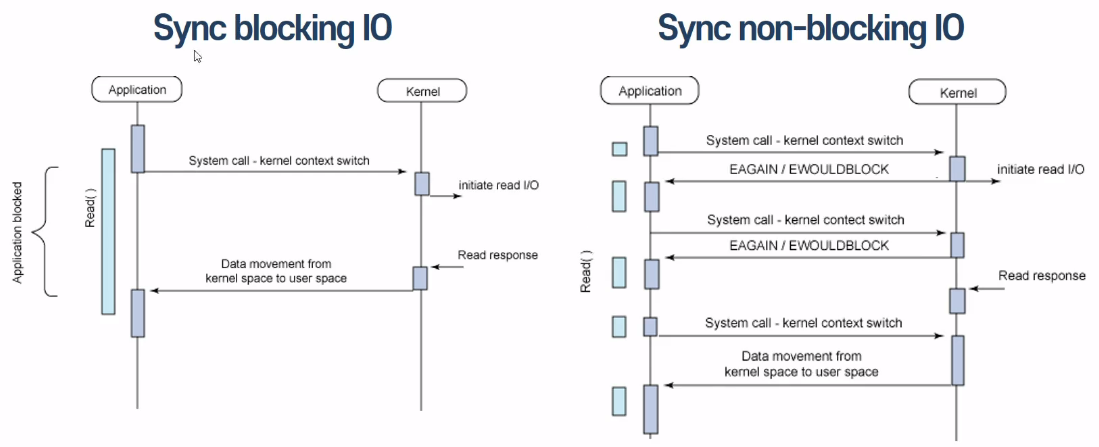
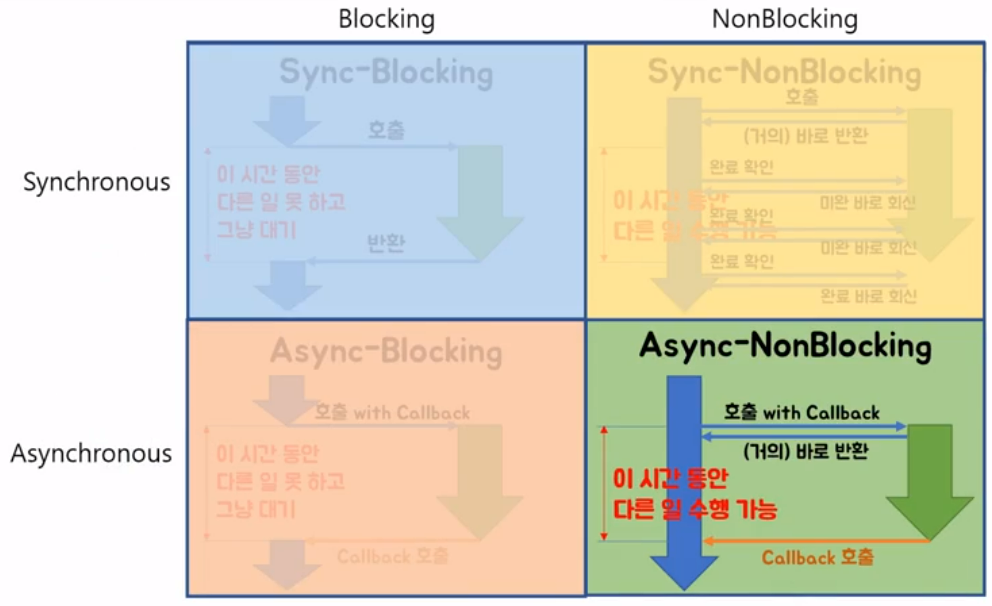
Blocking I/O and Non-blocking I/O
Blocking I/O:
시스템 콜 요청 시 -> kernel I/O 작업 완료 시 까지 응답 대기
제어권(I/O 작업) -> kernel 소유 -> 응답(response)전 까지 대기(Block) -> 다른 작업 수행 불가(대기)
Non-blocking I/O:
- 시스템 콜 요청 시 -> kernel I/O 작업 완료 여부 상관없이 즉시 응답
- 제어권(I/O 작업) -> 유저 프로세스 -> 다른 작업 수행 가능(지속) -> 주기적으로 시스템 콜 통해서 I/O작업 완료 여부 확인
Async vs. Sync
Async:
I/O 작업 완료 여부에 대한 notice는 Kernel(호출되는 함수) -> 유저 프로세스(호출하는 함수)
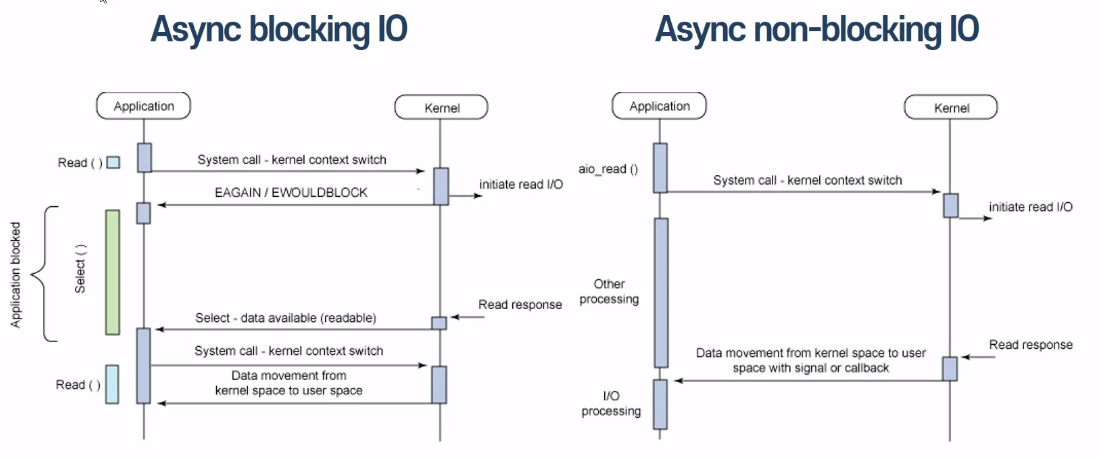
Sync:
I/O 작업 완료 여부에 대한 notice는 유저 프로세스(호출하는 함수) -> kernel(호출되는 함수)
comparison:
References
- 우리를 위한 프로그래밍: 파이썬 중급 인프런 오리지널
- “Advanced Python concurrency and parallelism”: https://medium.com/fintechexplained/advanced-python-concurrency-and-parallelism-82e378f26ced
- “Python concurrency - making sense of asyncio”: https://learningdaily.dev/python-concurrency-making-sense-of-asyncio-ebf18d722341
- “Understanding Generator Expressions in Python” https://towardsdatascience.com/understanding-generator-expressions-in-python-fe0c4534619
- “What is Generator in Python and How Does it Work” https://blog.devgenius.io/what-is-generator-in-python-and-how-does-it-work-e6e0588785c3
- “Coroutine in Python” https://betterprogramming.pub/coroutines-in-python-building-blocks-of-asynchronous-programming-40c39d9ed420
- “How to coroutines work internally in Python” https://blog.allegro.tech/2022/01/how-do-coroutines-work-internally-in-python.html