Customizing Training Process using Keras
customizing loss function
loss function이란?
ML model network의 loss function은 network이 얼마나 잘못 예측했는지는 수치로 계산해준다. Loss function을 통해 gradients of loss with respect to model weights(parameters)를 구해서 backpropagation을 통해 loss를 최소화하는 방향으로 model weights를 update해 나아간다. Iteration을 통해 반복적으로 model weights가 update하면서 지정한 evaluation metric을 통해 loss를 더 줄일 수 있는지, 아니면 이 정도에서 멈출지를 판단하고 더 이상 개선할 점이 없다고 판단되는 경우 update을 멈추고 optimized model network을 얻는다.
Keras에는 다양한 built-in loss function들이 있다. Keras API reference/Losses
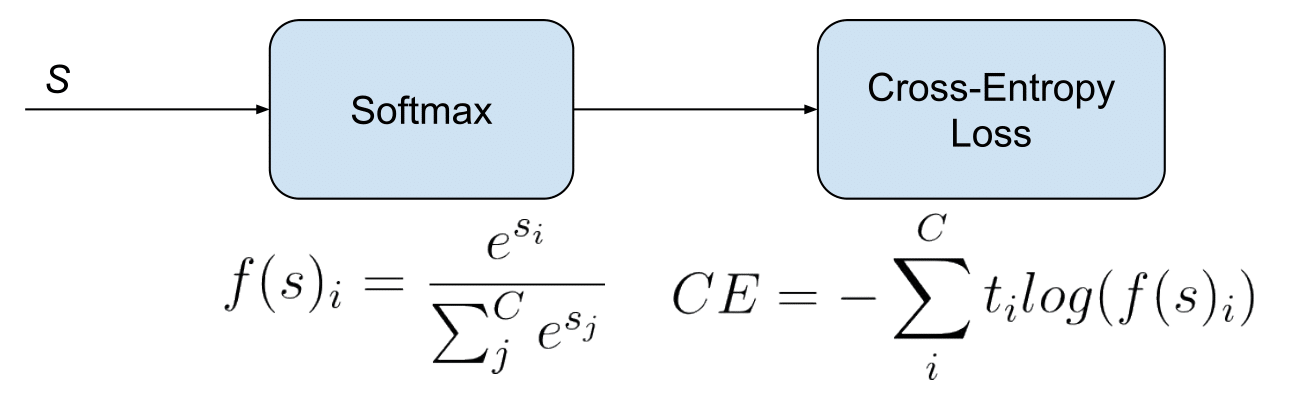
Multi-class classification의 경우에는 다음과 같이 categorical crossentropy를 사용한다.
categorical_crossentropy는 true classes와 predicted classes사이의 cross-entropy loss를 의미한다. (label들이 one-hot encoding된 경우 categorical_crossentropy loss 함수를 사용한다.)
model = keras.models.Sequential()

model.add(Dense(100, input_shape=(1,), activation='relu'))
model.add(Dense(50, activation='relu'))
model.add(Dense(10, activation='softmax'))

model.compile(loss='categorical_crossentropy', optimizer='adam')
이미 정의된 loss function이 아닌 내가 직접 정의한 loss function을 사용할수도 있다.
def custom_loss(y_true, y_pred):
    # calculate loss, using y_pred
    return loss

model.compile(loss=custom_loss, optimizer='adam')
customizing training loop
Keras의 GradientTape을 통해 training loop에 원하는 설정을 넣을 수 있다.
간단한 예시로 다음 code와 같이 keras.Model class의 subclass를 만들고, train_step(self, data) method를 다시 정의한다. 이 train_step함수가 loss를 평가하는 metric 이름과 값을 mapping하는 dictionary를 return하도록 정의한다.
class CustomModel(keras.Model):
    def train_step(self, data):
        # Unpack the data. Its structure depends on your model and
        # on what you pass to `fit()`.
        x, y = data

        with tf.GradientTape() as tape:
            y_pred = self(x, training=True)  # Forward pass
            # Compute the loss value
            # (the loss function is configured in `compile()`)
            loss = self.compiled_loss(y, y_pred, regularization_losses=self.losses)

        # Compute gradients
        trainable_vars = self.trainable_variables
        gradients = tape.gradient(loss, trainable_vars)
        # Update weights
        self.optimizer.apply_gradients(zip(gradients, trainable_vars))
        # Update metrics (includes the metric that tracks the loss)
        self.compiled_metrics.update_state(y, y_pred)
        # Return a dict mapping metric names to current value
        return {m.name: m.result() for m in self.metrics}
Simple MNIST model을 기반으로 train_step() 함수가 어떻게 customize 될 수 있는지 다음 code snippet에서 확인해볼 수 있다.
2번의 epoch가 실행되고, 매번의 epoch마다 별로 for loop으로 batches로 나누어진 dataset을 iterate한다. 각 batch 마다 GradientTape() scope를 열고, scope내에서 model의 forward pass를 수행하고 loss를 compute한다. 그리고 scope밖으로 나와서는 gradients of the weights of the model with regard to the loss를 구한다. 마지막으로 optimizer를 사용해서 gradients를 기반으로 model의 weights를 update한다.
inputs = keras.Input(shape=(784,), name="digits")
x1 = layers.Dense(64, activation="relu")(inputs)
x2 = layers.Dense(64, activation="relu")(x1)
outputs = layers.Dense(10, name="predictions")(x2)
model = keras.Model(inputs=inputs, outputs=outputs)

# Instantiate an optimizer.
optimizer = keras.optimizers.SGD(learning_rate=1e-3)
# Instantiate a loss function.
loss_fn = keras.losses.SparseCategoricalCrossentropy(from_logits=True)

# Prepare the training dataset.
batch_size = 64
(x_train, y_train), (x_test, y_test) = keras.datasets.mnist.load_data()
x_train = np.reshape(x_train, (-1, 784))
x_test = np.reshape(x_test, (-1, 784))

# Reserve 10,000 samples for validation.
x_val = x_train[-10000:]
y_val = y_train[-10000:]
x_train = x_train[:-10000]
y_train = y_train[:-10000]

# Prepare the training dataset.
train_dataset = tf.data.Dataset.from_tensor_slices((x_train, y_train))
train_dataset = train_dataset.shuffle(buffer_size=1024).batch(batch_size)

# Prepare the validation dataset.
val_dataset = tf.data.Dataset.from_tensor_slices((x_val, y_val))
val_dataset = val_dataset.batch(batch_size)

# define a training loop to iterate over epochs
epochs = 2
for epoch in range(epochs):
    print("\nStart of epoch %d" % (epoch,))

    # Iterate over the batches of the dataset.
    for step, (x_batch_train, y_batch_train) in enumerate(train_dataset):

        # Open a GradientTape to record the operations run
        # during the forward pass, which enables auto-differentiation.
        with tf.GradientTape() as tape:

            # Run the forward pass of the layer.
            # The operations that the layer applies
            # to its inputs are going to be recorded
            # on the GradientTape.
            logits = model(x_batch_train, training=True)  # Logits for this minibatch

            # Compute the loss value for this minibatch.
            loss_value = loss_fn(y_batch_train, logits)

        # Use the gradient tape to automatically retrieve
        # the gradients of the trainable variables with respect to the loss.
        grads = tape.gradient(loss_value, model.trainable_weights)

        # Run one step of gradient descent by updating
        # the value of the variables to minimize the loss.
        optimizer.apply_gradients(zip(grads, model.trainable_weights))

        # Log every 200 batches.
        if step % 200 == 0:
            print(
                "Training loss (for one batch) at step %d: %.4f"
                % (step, float(loss_value))
            )
            print("Seen so far: %s samples" % ((step + 1) * batch_size))
using fit()함수의 parameters (class_weight, sample_weight)
tensorflow.keras.Model(training/inference features를 가진 하나의 object로 layers를 group하는 class) 또는 tensorflow.keras.Sequential(tf.keras.Model로 linear stack of layers를 group하는 class)의 fit()함수의 argument를 통해서 다음 두 가지 방식으로 weight를 조정할 수 있다.
class_weight
분류하려는 class별로 weight를 다르게 주는것이다. scikit-learn library에 compute_class_weight() 함수를 사용하면 multi class classification문제와 같이 여러 class의 frequency based weights를 한번에 쉽게 계산할 수 있다.
compute_class_weight() 함수는 complete array of classes(y)와 set of unique class labels를 input받아서 다음과 같은 output을 반환해준다.
class weight = n_samples / (n_classes*np.bincount(y))
더 sample수가 많은 majority classes는 np.bincount(y)가 더 크기때문에, class weight는 더 낮은 값이 적용된다. Sample수가 적은 minority classes는 그와 반대로 더 높은 class weight가 적용된다.
# 다음 함수를 통해 class별 weight 설정
def generate_class_weights(train_y):
    train_y = np.argmax(train_y, axis=1)
    class_labels = np.unique(train_y)
    class_weights = compute_class_weight(class_weight='balanced', classes=class_labels, y = train_y)
    return dict(zip(class_labels, class_weights))
sample_weight
Class별 weight를 다르게 주는것이아니고, sample별 weight를 다루게 줄수도 있다. 종종 데이터셋내의 특정 sample의 신뢰도가 다른 sample들보다 떨어질때에, 이 parameter를 통해 원하는대로 weight를 조정할 수 있다.
# dictionary를 통해 sample이 특정 조건에 해당할 때에 weight=1.5를 갖도록 설정
weights = {'condition_A': 1.5, 'condition_B': 1.5, 'condition_C': 1.5}

# 다음 함수를 통해 샘플별 weight 설정
def generate_sample_weights(train_y, n_classes, weights):
    class_series = np.argmax(train_y, axis=1)
    sample_weight = np.ones(shape=(len(class_series),))
    for (condition,weight) in weights.items():
        sample_weight[class_series == list(n_classes).index(condition)] = weight
    return sample_weight
customizing data batch generation
keras.utils.Sequence class를 inherit하는 python class ‘DataGenerator’를 통해 직접 epoch마다 원하는 방식으로 batch of data를 생성하고 학습에 사용하도록 정의할 수 있다.
Sequence class는(documentation link) dataset과 같은 sequence of data를 fitting하기 위한 base object를 제공해준다. Sequence of data를 원하는 순서대로 원하는 량만큼을 사용할수 있도록 getitem(), len() method들이 반드시 정의되어야 한다. getitem()은 complete batch를 반환해야한다. 만약 훈련 epoch사이사이에서 dataset에 변화를 주고싶다면 on_epoch_end() method를 정의하면 된다. (만약 multiprocessing을 적용한다면, Sequence 를 사용하는것이 적합하다. Sequence class guarantees that the network only train once on each sampler per epoch.)
Sequence class를 inherit받아서 DataGenerator class를 정의한 예시: (example provided by Blog of Shervine Amidi)
import numpy as np
import math
import keras

class DataGenerator(Sequence):

    def __init__(self, list_IDs, labels, batch_size, dim, n_channels, n_classes, shuffle):
        'Initialization'
        self.dim = dim
        self.batch_size = batch_size
        self.labels = labels
        self.list_IDs = list_IDs # list of samples in dataset(each with an ID for identification only)
        self.n_channels = n_channels
        self.n_classes = n_classes
        self.shuffle = shuffle
        self.on_epoch_end()

    def __len__(self):
        'Denotes number of batches per epoch'
        return math.ceil(len(self.list_IDs) / self.batch_size)

    def __getitem__(self, index):
        'Generate one batch of data'
        # Generate indexes of the batch
        indexes = self.indexes[index*self.batch_size:(index+1)*self.batch_size]
        # Find list of IDs
        list_IDs_temp = [self.list_IDs[k] for k in indexes]
        # Generate data
        X, y = self.__data_generation(list_IDs_temp)
        return X, y

    def on_epoch_end(self):
    	'Updates indexes after each epoch by shuffling'
      	self.indexes = np.arange(len(self.list_IDs))
      	if self.shuffle == True:
      		np.random.shuffle(self.indexes)

    def __data_generation(self, list_IDs_temp):
    	'Generates data containing batch_size samples'
        # Initialization
        X = np.empty((self.batch_size, *self.dim, self.n_channels))
        y = np.empty((self.batch_size), dtype=int)
        # Generate data
        for i, ID in enumerate(list_IDs_temp):
            # Store sample
            X[i,] = np.load('data/' + ID + '.npy')
            # Store class
            y[i] = self.labels[ID]
		return X, keras.utils.to_categorical(y, num_classes=self.n_classes)
순서대로 설명:
init()
dataset과 관련된 정보를 argument를 확보한다 - dimension size, number of channels, number of classes, batch sizes, dataset내 sample들의 ID’s, 각 sample의 target labels, 등등… 여기에서 list_IDs는 dataset내의 sample들을 identify하기위해 각 sample별 주어진 ID를 list로 확보한것이다. 두개의 dictionaries partition과 labels를 생성해서 각각 train set/ validation set/ test set/으로 나누어진 samples를 keep track할 수 있고, sample들의 target label을 keep track할 수 있다.
>>> partition
{'train':['sample-1', 'sample-2', 'sample-3', 'sample-4', 'sample-5'],
 'validation':['sample-6','sample-7','sample-8'],
 'test':['sample-9','sample-10']}
>>> labels {'sample-1': 0,'sample-2': 1,'sample-3': 0,'sample-4': 3,'sample-5': 1,'sample-6': 8, 'sample-7': 5,'sample-8': 4,'sample-9': 3,'sample-10': 0,}len()
total number of samples / batch size= number of batches per epoch
Training 동안 each call이 [0, total number of batches] range내에서 batch index를 하나씩 request하도록 len을 정의 한다. Epoch마다 model이 training sample을 최대 한번만 볼 수있다.
getitem()
len()을 통해 request된 index를 가진 batch를 생성해내는 역할은 getitem() 함수가 수행한다.
on_epoch_end()
epoch의 시작과 끝마다 sample들을 shuffle 해서 epoch마다 model이 보는 sample들이 달라지도록 한다.
data_generation()
batches of data를 확보한다. 이 함수는 getitem() 함수에서 호출되어 사용자가 정의하는 방식대로 batch of data를 구성해서 batches of data를 확보한다. 이 함수를 통해 class imbalance 문제를 대응하기 위한 전략 중 bootstrapping 방식을 적용해볼 수 있다.
References
- [blog] customized data generation using Keras https://stanford.edu/~shervine/blog/keras-how-to-generate-data-on-the-fly
- [documentation] Keras > API References > Losses https://keras.io/api/losses/
- [blog] How to Create a Custom Loss Function Keras https://towardsdatascience.com/how-to-create-a-custom-loss-function-keras-3a89156ec69b
- [blog] Loss functions in keras https://neptune.ai/blog/keras-loss-functions
- Customizing what happens in fit() Colab https://colab.research.google.com/github/keras-team/keras-io/blob/master/guides/ipynb/customizing_what_happens_in_fit.ipynb
- [documentation] Keras > Developer guides > Customizing what happens in fit() https://keras.io/guides/customizing_what_happens_in_fit/#customizing-what-happens-in-fit
- [blog] clarifying loss functions for multi class and multi label classification problems https://gombru.github.io/2018/05/23/cross_entropy_loss/